Gravity Forms to Google Drive – GDrive Uploader
Seamlessly upload files to Google Drive from Gravity Forms submissions
GDrive Uploader – Gravity Forms Integration
Version 1.3.4 of GDrive Uploader introduces a major improvement: you can now send uploaded files directly into any Google Drive sub-folder by using the folder’s unique ID or the URL. This gives you full control over your folder structure and removes the need to wait for new folders to appear in the folder selector.
This guide shows you exactly how to find the folder ID and where to enter it in your Gravity Forms feed settings.
Why Folder ID / URL Uploads Are Better
Using a folder ID or the entire URL gives you:
- Instant access to new folders (no Google API delay)
- Precise control over where files are stored
- Support for deeply nested folder structures
- A faster setup since you don’t rely on the Drive folder picker
If you work with many sub-folders, this is the most reliable method.
Step 1: Open the Sub-Folder in Google Drive
Go to Google Drive and open the exact folder where you want the uploaded files to go.
It can be any folder. For example:
- A client folder
- A submission folder
- A project folder
- A sub-folder created manually inside your Drive
Once the folder is open, look at your browser’s address bar.
Step 2: Copy the Folder ID
When you open a folder in Google Drive, the URL looks something like this:
https://drive.google.com/drive/folders/1A2B3C4D5E6F7G8H9
The long string at the end is the folder ID.
Example:
Folder ID = 1A2B3C4D5E6F7G8H9
Copy only that ID or the entire UR – https://drive.google.com/drive/folders/1A2B3C4D5E6F7G8H9 .
That’s the unique identifier Google uses to route uploads to the correct folder.
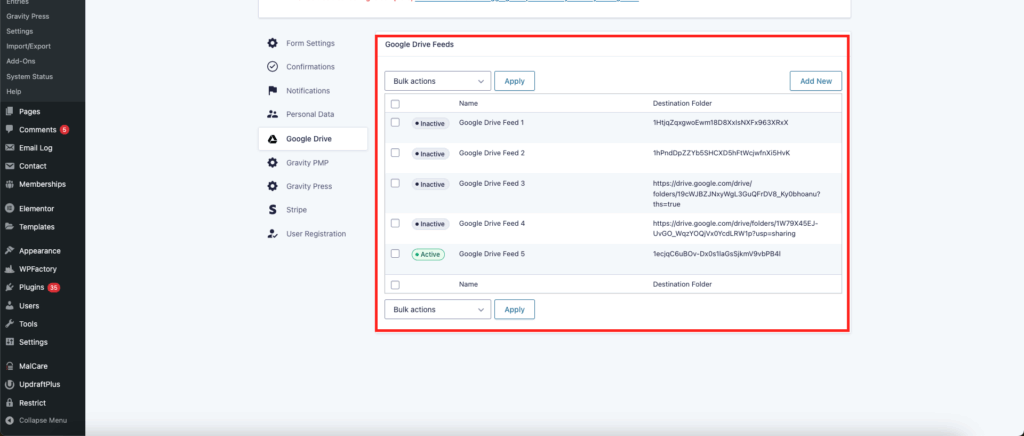
Step 3: Open Your Gravity Forms Feed Settings
Inside WordPress:
- Go to Forms
- Select the form you’re working with
- Click Settings > GDrive Uploader
- Open your existing feed or create a new one
You’ll now see the field where you can paste your folder ID or URL.
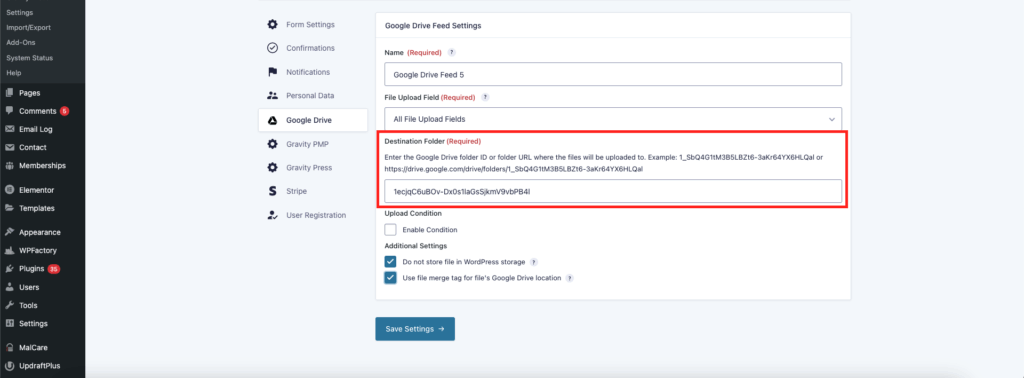
Step 4: Paste the Folder ID or URL Into the Folder Field
In your feed settings, look for the field labeled:
Upload Folder URL
or
Google Drive Folder ID
Depending on your version, it may be a text box or an option under Advanced Settings.
Paste the folder ID you copied earlier into that field.
It should look like this:
1A2B3C4D5E6F7G8H9
Save the feed.
Step 5: Test Your Form
Submit a test entry using the File Upload field.
Within a few seconds:
- A new file should appear in the exact sub-folder you selected
- Gravity Forms will show the Google Drive link in the entry
- Your notification emails (if enabled) will include the Drive link
If the file reaches the correct folder, your setup is complete.
Troubleshooting Tips
If files do not appear in your folder:
- Make sure the folder ID is copied correctly
- Check that your Google account is still authenticated in the plugin
- Ensure the form is using a standard Gravity Forms File Upload field
- Clear and re-save your feed settings
- Test with a small file first (e.g., a simple JPG or PDF)
If issues persist, you can contact support with:
- A screenshot of your feed settings
- The folder ID you’re using
- A test form URL
Using Folder IDs or URL With Dynamic Folders (Pro Feature)
Pro users can combine folder IDs with:
- Custom parent folders
- Dynamic sub-folder names based on form fields
- User-defined folder names
This allows powerful workflows like:
- Creating a folder named after the user
- Uploading files into a project directory
- Organizing submissions by event or client
If you need help configuring dynamic folders, reach out to support.
Summary
Using a Google Drive folder ID is now the fastest and most precise way to control where your Gravity Forms files end up.
You only need to:
- Open your target folder in Google Drive
- Copy the folder ID from the URL or the URL itself
- Paste it into your GDrive Uploader feed
- Save
- Test
Your files will go directly into that folder every time.