Gravity Forms to Google Drive – GDrive Uploader
Seamlessly upload files to Google Drive from Gravity Forms submissions
Overview
The Google Drive File Uploader plugin now includes a Secure Authentication option that allows you to connect Google Drive using your own Google Cloud project and OAuth credentials.
This method creates a direct connection between your website and your Google Drive account and is recommended for users who want greater control over their Google authentication setup.
Why Use Secure Authentication?
Google periodically updates its security and authentication requirements for applications that connect to Google services.
As a result, some users may encounter issues such as:
- Authentication errors
- Connection failures
- Unexpected disconnections
- Reauthorization requests
- Missing client_id errors
The Secure Authentication option helps reduce dependency on shared authentication services by allowing you to use credentials generated directly from your own Google account.
Benefits include:
- Direct connection between your website and Google Drive
- Greater control over authentication
- Improved long-term reliability
- Better compatibility with Google’s evolving security requirements
Before You Begin
Before starting, make sure you have:
- A Google account
- Administrator access to your WordPress website
- The latest version of Google Drive File Uploader installed
Video Tutorial
Video walkthrough:
If you prefer written instructions, follow the steps below.
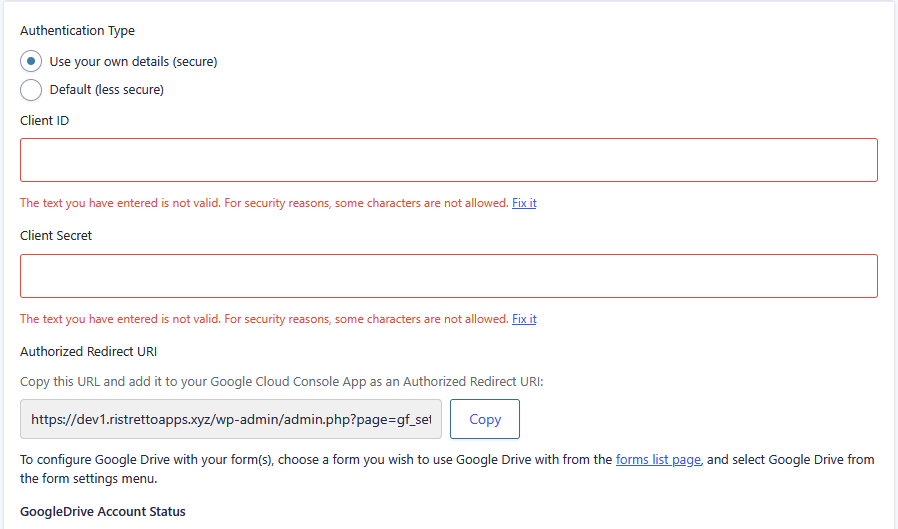
Step 1: Enable Secure Authentication
In WordPress, navigate to:
Forms → Settings → Google Drive
Under Authentication Type select:
Secure Authentication
You will also see an Authorized Redirect URL displayed on this page.
Leave this page open because you’ll need this URL later when configuring Google Cloud.
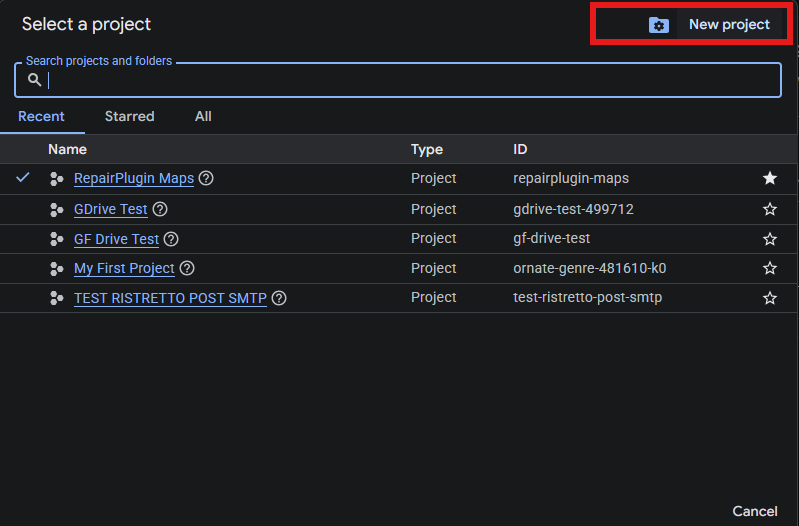
Step 2: Create a Google Cloud Project
Visit the Google Cloud Console.
Create a new project and enter a name that helps you identify it later.
Examples:
- My Website Drive Upload
- Company Drive Connection
- Gravity Forms Google Drive
Click Create.
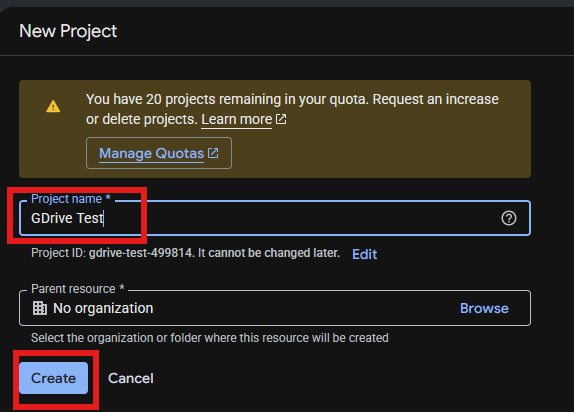
Once created, make sure the new project is selected from the project selector at the top of the Google Cloud dashboard.
Step 3: Configure the OAuth Consent Screen
Inside Google Cloud:
Navigate to:
Google Auth Platform
Click Get Started.
Complete the setup:
App Name
Enter a name for your application.
Example:
My Website Drive Upload
User Support Email
Select the email address you want Google to display and the email you are connecting.
Audience
Choose:
External
This allows Google accounts outside of a Workspace organization to authenticate.
Contact Information
Enter your email address.
User Data Policy
Accept Google’s policy and complete the setup.
Click Create.
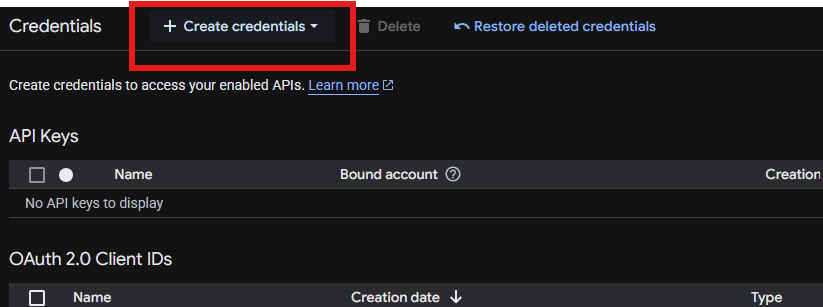
Step 4: Create OAuth Credentials
Navigate to:
APIs & Services → Credentials
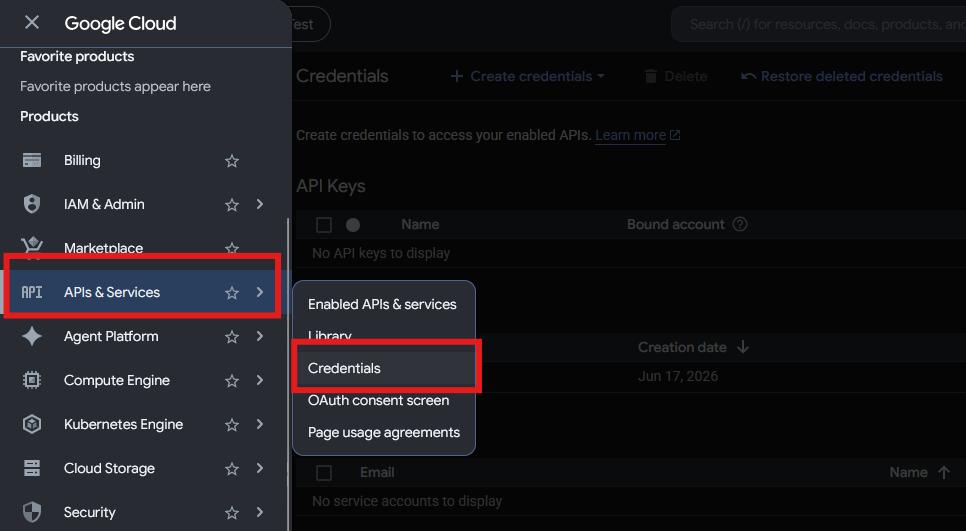
Click:
Create Credentials → OAuth Client ID
For Application Type choose:
Web Application
Give the credential a name.
Example:
Website Google Drive Connection
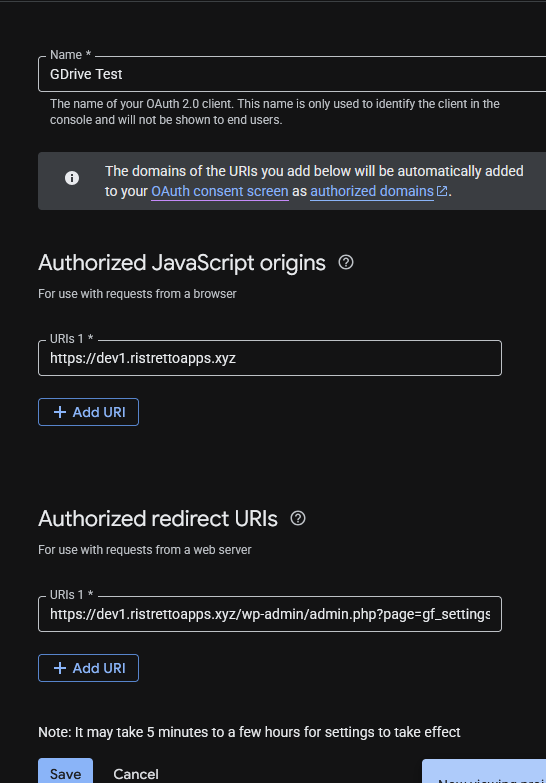
Authorized JavaScript Origins
Add your website URL.
Example: yourwebsite.com
Do not include additional paths.
Authorized Redirect URI
Return to your WordPress Google Drive settings page.
Copy the Authorized Redirect URL provided by the plugin.
Paste that exact URL into:
Authorized Redirect URIs
Click Create.
Google will generate:
- Client ID
- Client Secret
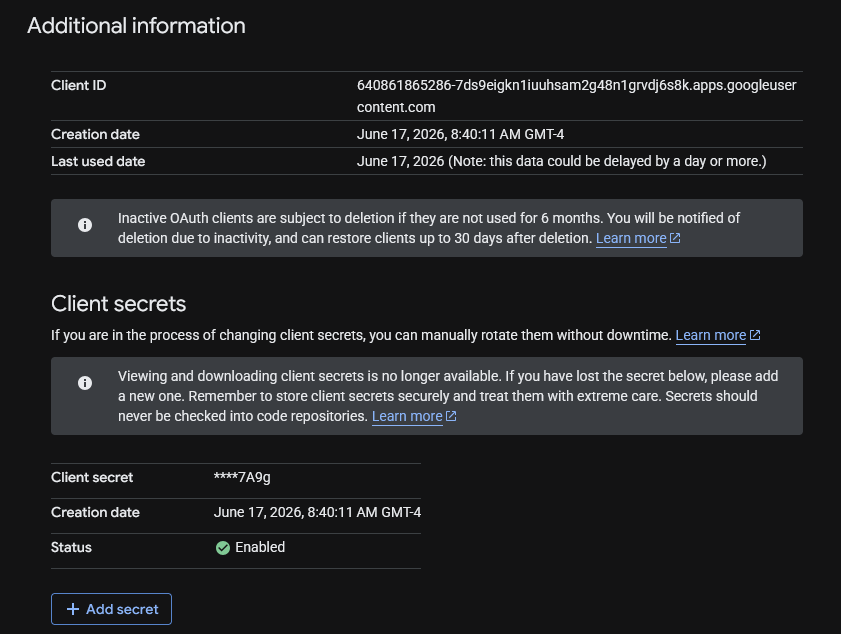
Keep this window open.
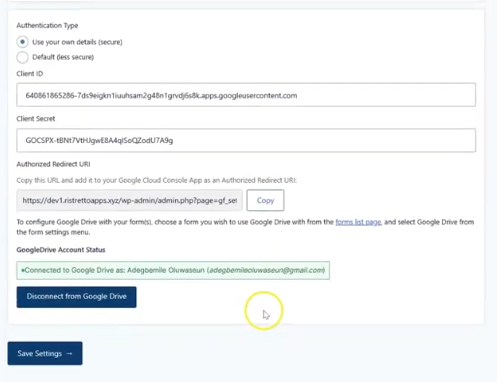
Step 5: Enter Your Credentials Into the Plugin
Return to WordPress.
Paste:
Client ID
into the Client ID field.
Paste:
Client Secret
into the Client Secret field.
Click Save Settings.
Step 6: Enable Google Drive API
Return to Google Cloud.
Navigate to:
APIs & Services → Library
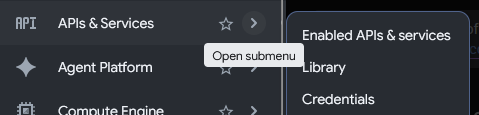
Search for:
Google Drive API
Open it and click:
Enable
The API must be enabled before the plugin can communicate with Google Drive.
Step 7: Add Yourself as a Test User
Navigate to:
Google Auth Platform → Audience
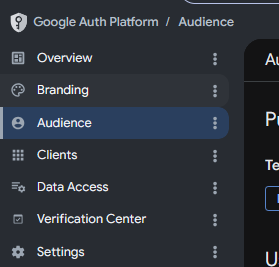
Scroll to:
Test Users
Click:
Add Users

Add the Google account you plan to use for authentication.
Click Save.
This step is required while your Google application remains in Testing mode.
Step 8: Connect Google Drive
Return to WordPress:
Forms → Settings → Google Drive Upload
Click:
Sign In With Google
Google may display a warning that the application has not been verified.
This is normal when using your own personal Google Cloud project.
Click:
Continue
Approve the requested permissions.
Once complete, the plugin should show that Google Drive has been successfully connected.
Step 9: Test Your Uploads
Create a test form submission that includes a file upload.
Confirm that:
- The form submits successfully
- Files appear in Google Drive
- Files are stored in the expected folder
- No authentication errors are displayed
Your setup is now complete.
Common Questions
Why am I seeing “Google hasn’t verified this app”?
This is expected when using your own Google Cloud project in Testing mode.
Because you are the owner of the project and have added yourself as a Test User, you can safely continue through the authorization process.
Why do I need to add myself as a Test User?
Google restricts access to applications that are still in Testing mode.
Adding yourself as a Test User allows your account to complete the authorization process successfully.
Do I need Google to verify my app?
No.
Most users do not need to submit their application for Google’s verification process.
Verification is generally only required when distributing an application publicly to a large number of users.
What happens if I skip the Test User step?
Google will block authentication and display an access denied or authorization error.
Always add the Google account you intend to use before attempting to connect.
Which authentication method should I use?
We recommend Secure Authentication.
This method uses your own Google Cloud credentials and provides the most reliable connection between your website and Google Drive.
Need Help?
If you run into any issues during setup, please contact support and include:
- Screenshots of the error
- Your plugin version
- Your WordPress version
- Your Gravity Forms version
This information helps us troubleshoot more efficiently.